Overview
In this article, we will review auto pay.
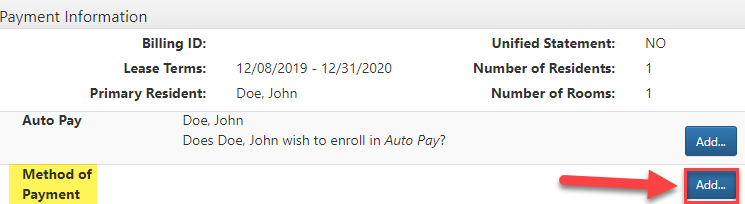
Auto Pay
Step 1: Scroll towards the top of the page and click the Setup Payment tab.

Step 2: If the resident(s) wishes to enroll in Auto Pay, click Add. If necessary, repeat for each resident.

Step 3: Use the Auto Pay Setup window to provide additional details.
- Provide the Country of Institution, Routing/Transit #, and Account #.
- Use the check box to indicate if the Account Type is Checking or Saving.
- Click Submit when finished.

Step 4: To provide the resident’s Method of Payment, click Add.
Step 5: Use the Method of Payment window to provide additional detail.
Step 6: Provide the Payment Type, Amount, and Note.
Step 7: Click Submit when finished.

Step 8: Next, scroll towards the top of the page and click Process.

Step 9: After clicking Process, use the check box to confirm the date of the move-in.

Step 10: To Finalize the move-in process, click Save for Auto Apply.


Was this article helpful?
That’s Great!
Thank you for your feedback
Sorry! We couldn't be helpful
Thank you for your feedback
Feedback sent
We appreciate your effort and will try to fix the article